Showing posts with label crafts. Show all posts

Tuesday, May 26, 2009

My latest creation

I stole the colors and general idea from a set at the coffee shop a few stores up from the pottery place. I have a sneaking suspicion that some one paints all the pottery (there was lots: plates, bowls, sets) at the pottery place and then sells at their coffee shop. Maybe I should do that. I have actually thought of that, but I need to come up with some trademark style or design or something. Also, I wouldn't buy this stuff at the price I would have to set to make a profit. That may pose a problem!


~~END~~

Click for full post and comments

Thursday, December 11, 2008

Color me mine

It's a lightup Christmas tree, if you can't tell.

PS. It came out really well. The white was opaque as promised.


~~END~~ Click for full post and comments

Tuesday, December 2, 2008

Look what my mommy made

It's a baby blanket for a friend's newborn. She is coming to terms that she will never make one for her own grandchildren.


~~END~~ Click for full post and comments

Thursday, November 20, 2008

More drinkin' and paintin'

Just a small bit of what my friend is painting.


~~END~~ Click for full post and comments

Drinkin' and paintin'

I'm here right now. Notice the top of the bottle.


~~END~~ Click for full post and comments

Tuesday, October 28, 2008

Pottery and alcohol DO mix!

I went to a "ladies night" at the local paint pottery place last week. It was awesome, because it's BYOB!!! So I was slamming bloody marys, and my friend was sipping red wine. All very sophisticated, I tell you. I picked up my pieces today:


It's hard to tell in the picture, but there are two colors of blue: a darker regular sort of blue, and a turquoise color. I had already had at least one bloody mary by the time I was done with the teapot, and had put it away on the drying shelf when I started to cup. I forgot my color scheme and got the blues backwards. YAY alcohol. The cause of, and solution to, all of life's problems. /Homer

Oh man, don't even get me started on the ladies who were Very Serious about their Art. I would usually be the one to get Very Serious about my Art, but I can tell when it's time to just chill and not act like a geek. Also I recognize the fact I have not painting ability whatsoever. Click for full post and comments

Sunday, April 15, 2007

Washi Bill-holder: Instructions III

The bill-holder:
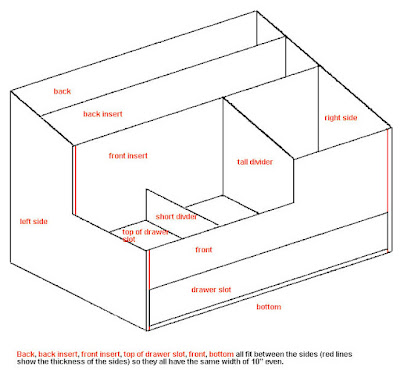
Here is my schematic I drew up and used for my measurements. (click for full size) The back slot goes all the way to the bottom, and it tall enough for the long envelopes, #10. The second slot goes down to the top of the drawer (tall enough for #6 3/4), so the drawer compartment is totally enclosed and does not go all the way to the back (the drawer is big enough for #10 envelopes). Then the three compartments in the front are for things like stamps, labels, paper clips, whatever and a pen holder. I didn’t measure and cut out the piece for the drawer until the whole thing was put together, because I knew there would be a mistake somewhere and I’d just end up recutting the drawer.
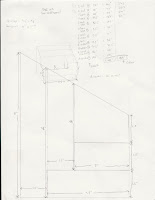
The footprint is more than 6” x 10”; the bottom piece is 6 x 10, but the sides and back come down around the outside of the bottom piece. The only pieces that I doubled the thickness of cardboard were the sides and bottom. In the future, I will make the back double thickness too, because it was a real pain getting that part flat. (The double thick parts stayed flat after they got wet from applying the base paper, because they were thick enough to resist warping. The back, though, got very disfigured after applying the paper, and it was difficult getting a flat heavy thing tucked in there to flatten it as it dried. It took multiple attempts of rewetting and flattening.)

Here is at least one cut-out of each piece needed (except drawer), using the watercolor matte:
There ar 10 individual pieces, not counting the ones that get 2-ply (back, if you choose, both sides, bottom). Here are my templates with their measurements for each piece. They are notebook paper, so it may be hard to tell where the edge is in some pictures. I would go with the measurements and draw up my own:

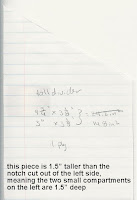
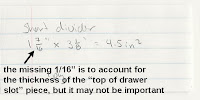


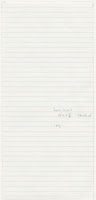
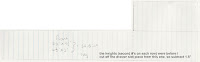
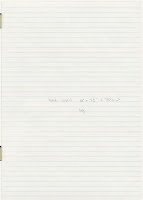
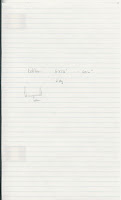
I wrapped the following pieces separately from the unit as a whole: back slot divider, front slot divider, short divider, tall divider, top of draw compartment, front (see diagrams from part II). These were set between large flat heavy things with newspaper so they would dry flat. The rest (two sides, back, and bottom) were taped together (purple is cardboard in the picture)

and a single piece of the base paper was use to cover the outside with tabs to wrap around to the other side of the cardboard.

In hindsight, I could have done the bottom panel as a separate piece, so that I would have tabs from the sides and back pasted to the bottom, and then a separate piece would cover those tabs, the whole bottom, and then a tab would come up around the front into the drawer compartment. So, with all those tabs wrapped around to the inside of the structure, separate pieces are used as facing to cover the tabs.


To get that one big piece of base paper to cover the sides, back, and bottom, I laid the taped-together unit on its back, made an outline with the chalk pencil, carefully rotated it onto a side, made another outline, other side, outline, onto the bottom (so it’s sitting upright now), outline. You end up with a multi-segmented contiguous piece of paper. From the outline you can cut tabs, but it’s better to cut the tabs a little big to make some overlap so the corners get covered well. When cutting the tabs, remember that they’re going to have to go around a 1/8” thick piece of cardboard, so make them on the long side. Making it so that a half inch of tab is actually on the other side of cardboard is fine.

So now the bare-bones unit should be totally covered in base paper: the one big piece on the outside, and the separate ones to cover each face on the inside. Now you can start putting in your individually wrapped dividers that hopefully are still nice and flat. Even though I had very precise measurements (to the 1/16") I just moved the pieces around until they hit both the bottom and the slanted top in the right place. I glued them into place and then used strips of base paper softened in paste the same as if they were pieces of tape. The edges blend in so well that I did this strip method on the front divider piece in plain view (mostly to cover up the seam between this piece and the side) and I can’t see where it is now. So continue with the gluing and the pastey strip method to get all the individual dividers into place. Unsightly seams, joints, unions, whatever, can be covered up with the pastey strip method, with the strips cut to the exact length of the seam to be covered.

Now the only things that should be left are making the actual drawer and putting on the fancy paper. Measure the drawer compartment that remains, and keep in mind that you don’t want too snug of a fit. You can cut the drawer in one piece, and score the four edge to fold up and then tape together. I totally covered the drawer in base paper, but if you want to only do the inside and the first half or so of the front and sides, that’s fine. Just keep in mind what will be visible and what won’t be. I used two pieces of base paper, one for the whole outside, along with tabs like I did for the outside of the larger unit, and then another piece to fit in the bottom and up the sides of the inside of the drawer.


So now hopefully you have the whole thing done and covered in the base paper. We’re in the home stretch! Cut your fancy paper pieces smaller than the face it is covering. I was aiming for something like 1/8” of base paper showing around the edges of the fancy paper. The washi and yuzen papers soak up the paste wonderfully, compared to the black paper I had for the base. Be careful also that the fancy paper doesn’t stretch or expand too much: the long rectangle on the front of the drawer was probably half an inch or more longer wet than it was dry! Apply the same as before, with smoothing from the sponge and wiping off the excess paste. To apply the handles on the drawer I had to drill pilot holes and then screw them in. Sometimes I can just screw them right in without any help (I think this depends on the kind of cardboard).

Yay! You’re done! I hope it’s pretty! Click for full post and comments

Washi Bill-holder: Instructions II

The technique:

You will use two pieces of base paper to cover one piece of cardboard. Lay your piece of cardboard down onto the back of your base paper and make an outline.Roughly cut this out keeping in mind that you want tabs on all sides of the piece of cardboard to wrap around the other side.

Cut tabs.
Fold tabs around to back side, trying to cover the corners also.
Cut out another piece of base paper that will go on the opposite side of the first piece that had tabs (so it will be a mirror image, if an awkwardly shaped piece). This piece of base paper is to be cut just slightly smaller than the actual dimensions of the cardboard piece, because you want the edges of the paper firmly pasted in place. If an edge is exposed, it is not only ugly, but it allows for the possibility of damage by ripping.This is why cutting the tabs big on the first piece of paper is a good idea: some overlap as you come around the edges can cover up the corners, and also cover up the area just outside the reach of the second piece of paper (between its corner and the corner of the cardboard). To get the paper to stick to the cardboard, liberally apply the paste with finger or sponge, smooth it out some, and let it soak in for a minute. This part really depends on the type of paper you have. The black paper on a roll I had was thick, but softened after letting the paste sit for a minute of two. Also, apply paste to front and back so it can soak in for both directions. With most of the excess off (you don’t need it dripping) lay the paper onto the cardboard and use your finger or sponge to smooth out bubbles. Get the tabs wrapped around the other side, and make adjustments to get the corners covered up. You’ll find that the soft paper really yields to the folds and adjustments you need it to make. Do the same thing for the smaller piece of paper, and get the side with the tabs covered up. Smooth out bubbles and wipe off excess paste (I use either a dry sponge, paper towel, of sponge with just a hint of water). Put this under a large flat heavy thing with some newspaper to get it dry and flat. You’ll have to change out the newspaper in an hour, then the second newspaper is probably good for a week). I had my pieces in the flattener for a week, because that was the next time I could get to the project, and it worked perfectly. Click for full post and comments

Washi Bill-holder: Instructions I

First, the main idea of this type of project is to cover ordinary cardboard with pretty paper. Traditionally this is done with organic pastes (rice flour or wheat flour and water) and papers especially designed for the task, called Washi and Yuzen. Think decoupage, but Oriental and therefore classier. The pieces I have seen around the internet have a base paper of some solid color, usually black, with the washi or yuzen "fancy paper" put on in certain places for accent.

So, you first have to start with a cardboard object. You can find boxes and such at a craft store like Michael's. I prefer to make my own cardboard objects. My first washi project was a small three-drawered jewelry box, and this bill-holder is my second project. (You can also find really simple pre-fab projects with self-adhesive paper and cardboard and instructions included. Normally you would have your whole object put together first (cardboard held together by masking tape, not glued) and then cover the object as a whole with the black paper. This means you have to really plan out the shape of this one big piece of paper, where all the notches are, how things get folded over, etc.

Supplies:
cardboard
paper
paste
sponge
newspaper
large flat heavy things for flattening
exacto knife
pencil
ruler
masking tape

Cardboard for your object: With smaller projects if you keep the cardboard that comes with your origami paper you can use that. With some packs of paper I got cardboard that was upwards of 1/8" thick. The size of this project though, forced me to go looking for cardboard whole-salers. No luck for 1/8", but I did find watercolor matte at Michael's that comes 2' x 3', and is 1/16” thick. I first cut out all the pieces I needed and then glued together the ones I wanted to be 1/8” thick

What paper to use: If your object is small enough, the large size origami paper works well for the base black paper. Once everything is pasted down, it is very difficult to see seams or overlaps of paper. Even if you can't see the overlaps, I still like cover as much (all) surface area as possible with one piece of paper. So, my bill-holder was too big for the large origami paper, so I found a roll of black paper at Michael's. I'm not sure what it's for, maybe scrapbooking or something. It's rather thick, and I would say it's the thickest paper you'd ever want to use in washi projects. (paper softens up with the paste, but this stuff almost not enough). Whatever paper you find, make sure it isn't too waxy, like the generic origami paper. This stuff still soaks up the paste eventually, but once you see how washi or yuzen paper reacts to the paste you'll understand. Once you have the base paper selected, you have to find a fancy paper. Again, if you project is small enough, you can find origami paper (the good kind, not generic) that will fit your accent spaces. If not, like this bill-holder, you have find paper in 3' x 4' sheets. Find a pattern and color you find pleasing. This is why I find the black base paper the most attractive. You don't have to worry about clashing colors between the base and the fancy papers. The black paper recedes into the background and makes the fancy paper the focus.

Paste: I hear you can buy the right kind of paste already made up, but making it is so easy that I don't bother. I use wheat flour, like the kind for baking. 1:7 ratio of flour:water. I do this is teaspoons and it makes a good volume to work with. Cook this on the stove on low heat with constant stirring. After a while (depends on how fast your stove is) you'll see the mixture go from the flour simply suspended in the water to actually a homogenous solution. It'll get thicker, has a translucent look to it, and I usually let it go until it has boiled for maybe a minute. Then I take it off the heat, let it cool some, and decide if the consistency is right. I usually end up throwing in one more teaspoon of water at this point to thin it down just a touch. For consistency keep this in mind: if there is too much flour in the paste, it will not give a transparent finish, especially against black paper. If there is too little flour in the paste, it won't act like a paste!
**The paste does go bad! You can keep it in the fridge, but it probably won't last even a week that way. It's easy to make, so no big deal.**

Sponge, newspaper: Sponge for applying the paste and wiping off excess and giving a wipe down after the paper is applied (working out air bubbles, etc.). Newspaper for soaking up the moisture. You can lay your paper to be pasted out on the newspaper, apply the paste while going over the edges and not have to worry about it.

Large flat heavy things: I happened to have 1’ x 1’ marble tile in the garage and boxes of ammo for weight, This combination worked excellently to flatten pieces as they dried. (another use for the newspaper here: to soak up moisture in the flattening process.)

Exacto knife: A sharp blade cuts the watercolor matte fairly well. I did two slices along the ruler as a straight-edge, then the track was deep enough to not need the straight-edge anymore

Pencil: Regular one for the fancy paper (it’s white on the back), but had to use the white chalk pencil (for sewing) on the black paper.

Ruler: Any straight edge with markings, and also a triangle or T-square to get right-angles.

Masking tape: This works well for putting the cardboard together. I had a roll that was 2” wide and very thin tape. So thin that is was hard to tear off the roll.


To be continued... Click for full post and comments

Tuesday, March 27, 2007

Washi project--Bill organizer

I don't know what you call these things, but I just finished this. I will put together instructions soon. The fancy paper is from Japan, and the black paper is some wrapping paper or craft paper or something that came on a roll from Michael's.
Click for full post and comments

Friday, February 23, 2007

Seven years bad luck

My mosaic mirror has been hanging on the wall for the first time ever for about a month. It cracked. The mirror part, no the grout. My guess it that it wasn't designed to hold it's weight and there were stresses in it. I had epoxied the glass to that particle board stuff with the holes in it. I guess I didn't realize epoxy would not expand and contract enough to join these two different materials together. So, my plan is to either place a mirror over the cracked one inside the recessed area, or try to chisel out the cracked part. The first one sounds easiest, by far. Click for full post and comments

Thursday, February 1, 2007

Mosaic mirror


Here's a mirror (the only one I've completed) I did a while ago. It took me a long time to get it finished because I wasn't happy with how the grout turned out. I ripped up every single tile and chipped out all the grout! This was only possible because instead of applying the tessarae to a wood frame and then inserting a mirror, I just applied everything directly to a large mirror. It actually works pretty well because when you make a mistake you can easily pull the adhesive off the glass. I currently have another one going that is a wood frame. If you want to pull a tile off that's dried, you pull up a good amount of wood too. (This can be avoided by using high density fiber board, that smooth brown stuff). So I essentially did this mosaic twice! It was a good learning experience, and every time I look at the finished product I look at what I should do differently or the same for the next one.

All of my materials: tile, grout, nippers, sponges and applicators, adhesive, were purchased at MosaicMercantile.com.

So, the tessarae are applied directly to the glass mirror, I used one that was 8"x10". Before I got started I epoxied that brown board stuff with the holes in it (that you would stick the metal hooks in that would hold your tools in your shop). I used the board with the holes in it 1) that's the first the first thing I found, and 2) it gives more surface area for the epoxy to stick: it comes up through the holes a little.

Then I measured the desired width of the mosaiced part and drew with permanent marker. Windex removes the marker, and it won't rub off too much from just your hands (you still have to be a little careful). The daisies and snail by me, but the butterfly is way too good for me. I used a form from MosaicMercantile. I put those objects down first, then filled in the background. This is where I need the improvement. I needed to really pay attention to outlining the objects before doing the ordered background. Everything gets kinds of jumbled near each object, where I wanted it more defined. So that's what I'm working on in my current mirror.

When everything was dried and grouted, I screwed two short screws to the back and attached hanging wire. And now it's on my bathroom wall. Click for full post and comments

Wednesday, January 3, 2007

Things I'm not ashamed of

Movies I love and get pissed off when they're on TV because of the crappy editing/dubbing: Heat; Goodfellas; Casino; The Big Labowski; the worst offender, Office Space.

Movies I love: Dodgeball; Sin City; Snatch; Equilibrium; Bad Santa; and some James Bond movies, too many to list or remember.

Bands I love and every one else is an idiot for not doing the same: Pearl Jam; Who; Doors; Queen; Tool; Floyd.

Bands I like and am not ashamed to admit: Collective Soul; Guster; Goo Goo Dolls; Stabbing Westward; Filter.

Books I have read and loved: The Hobbit and LOTR; anything by Toni Morrison; Neal Stephenson's Cryptonomicon, Snow Crash; Richard Adams' Watership Down.

Books I have read, enjoyed, but am only now coming to appreciate: Neal Stephenson's Diamond Age. It's set in the immediate future, before Snow Crash, and world events of the last year or so have really made me realize what an accurate sense of the development of civilizations he has. All these books were written in the 90's, but you'd swear they were up-to-the-minute current. Oh yeah, he's f'ing hilarious too (scroll to the excerpt).

My husband is trying to get me to read Stephenson's Baroque Cycle books, I just haven't gotten there yet.

Those are all literature type books. I enjoy a good Tom Clancy now and again.

That reminds me:

I am also not ashamed to admit that I own an Xbox 360, and am currently about to finish Splinter Cell: Double Agent. Then it's on the the other game I got for Christmas, Call of Duty 3. Then I'll rent the latest Hitman one. Then maybe Halo 3 will be out finally.

Crafts I have going on in the background pretty steadily, it's just a matter of finding the time to do it. I have a cross stitch going for my Grandma. I am honestly worried she won't be alive when I finally get it done. It's got butterflies on it. It's purty. I also have a mosaic going. I am currently only using glass tessarae, but I think I may give marble or unglazed ceramic tile a try too. I am also in the design stages of a washi project (that link is an example of what I'm talking about): making a bill organizer that goes on your desk. Yes, you can buy those for less than I'll probably spend on paper, but I'll have made it with my own hands! I have also decided that the foyer needs an origami mobile. A big one. We're talking two stories to fill here. It will probably be tall and skinny, because a lot of the space is tall and skinny. Makes sense, right? Click for full post and comments