Thursday, June 26, 2008

Summertime III

I am still trying to get lightning bug pictures, but I'm starting to think it's impossible. I want to capture all the trees sparkling, but it's just not bright enough to pick up. It would work if they were stationary lights that go on and off, because the light would just add to itself as the photo exposes. But they move, so it's just tiny flashes everywhere. I got a remote and some kick ass lenses for early birthday presents. The remote allows be to get into bulb mode, so now I can get longer than 30sec exposures. It's awesome!
But I still only seem to be able to pick up any stray guy that flies right through the field of view.

Totally unrelated to summer time, here's a fish picture. He's in the future (getting closer every day!) Discus tank.
Click for full post and comments

Sunday, June 22, 2008

Summertime II

These tiger lilies are all over the damn place here. I still like them, even though I think they are plotting to take over the world.


Taken on the D80, standard 18-55mm lens; f11; 1/125 sec; no manipulation. (Bottom one is just a crop of the top, original. No zoom.)
Click for full post and comments

Saturday, June 21, 2008

Summertime I

There was a dragonfly buzzing around while I was trimming a tree today, so I went for the camera of course. He was very cooperative and stayed put while I fiddle with settings. Oh yeah, forgot to mention that I got a Nikon D80 for Christmas. It's awesome! So here's my buddy, the dragonfly (one of only a couple bugs I won't kill on sight):

All these are cropped from the originals, but there is no zoom done. I've got the biggest and highest size and resolution set on the camera, so you end up with gigantic pictures. This next one has such freaky colors because I did manual aperture and shutter, and it came out over exposed, so I tried to fix it.

This one has some sharpen done to it, but only one dose, I think. This was with auto settings, so I didn't have to change anything with brightness/contrast.

All pictures: Nikon D80, 18-55mm lens
top: f5.6; 1/100 sec; crop, slight brightness/contrast, sharpen
middle: f5.6; 1/50 sec; crop, -0.5 eV, brightness/contrast, auto level, auto color, sharpen
bottom: f5.6; 1/125 sec; crop, slight brightness/contrast, sharpen
Click for full post and comments

Friday, June 20, 2008

Animal update

So, the chameleon died a few months ago. While we were in Fiji, actually. The guy taking care of the animals feels pretty bad still, but I know it wasn't his fault. You see, it was a female, and females lay eggs even when they aren't fertilized. So, of course she died because she was egg bound. I KNEW that was going to happen.

And of course you can't just have an empty cage laying around, so I decided it was time to venture into the exotics. And by exotic I mean lizards than any fool can manage to not kill. My local pet store does lizards and fish, and they had a batch of Bearded Dragons and also a Uromastyx. These were the two I had decided on from the reading I had done, and didn't really know which I would get. I decided on the Beardie because they were babies. And they had a male, because I don't want a female lizard ever again, unless I want to make babies. So I was going to give this guy a cool Dragon name, but he is now know as Fat Boy.

Because he's fat. (he's stuck in this picture, and I ran for the camera instead of first helping him out)

And he's a real clown. Here he is in his favorite position, watching the fish that are right next to him (something to keep him occupied).


Whatchulookinat, bitch. Gimme food.

He is currently 16 inches long, which is within maybe 6ish inches of his final adult length, and is about 5 months old. These guys eat greens and live food like worms of all types and crickets. I finally broke down and ordered 1000 worms because I got tired of going to the pet store every other day. He eats Dandelion greens the best, which is good cuz that's free! But I do get him to eat other greens lie kale and chard. And yes, I buy that especially for him. I only like lettuces and spinach, and he can't have spinach. He's supposed to eventually eat less live stuff and go for the greens more, but so far no such luck.
Click for full post and comments

Saturday, April 5, 2008

Fiji 2008

I went to the most awesome place at the end of February: Fiji! Specifically Shangri La's Fijian Resort, on its own island on the south side of the main island (Viti Levu?). It's on what's called the coral coast, so the waves break 100-200 yards off the beach, making a lagoon that is easy for snorkelling. I had never snorkelled before, but all you really have to do when the water is three feet deep is float. It was so rad I don't have words. So there are lots of pictures instead:

First a few of some of the property:

On the one Saturday we were there there were two (or more) weddings going on. It looked like the chapel was being set up for a wedding, but we saw one ceremony on the lawn by the rooms. So maybe it was on the lawn because the chapel was booked. Anyway, one bride I saw had on a real gown, like the kind you don't want to get dirty. Who does that for a freakin wedding in Fiji? That's dumb. The other party looked a little more beach-themed.

Kava is a native drink that they say "one makes your tongue numb, two takes it away, three puts you to sleep". I only had one, and my tongue went numb. Apparently it's a mild narcotic.

I took lots of sunset pictures, and it was finally when we were getting on buses for the airport did it get real colorful with pink and other colors.

The place is beautifully landscaped, and when you walk around the island you see some of their facilities: green/hothouses growing areas, etc. The place it pretty much self contained in all ways except electricity. That I think comes from the main isalnd, but water and sewer are all taken care of on site.
Spent lots of time on the beach. The snorkelling pictures are all film, so they need to be scanned.
You can pay for excursions off the property, like zip line through the jungle, or visit a village for lunch and kava ceremony, or a dinner or all day cruise. We didn't do any of those, but our group was treated to a fire walking ceremony (followed by dinner and more fire-themed entertainment, of course)on the resort property.

From "Beach Bar and Grill":

From the cabana at Takali Bar:

The next two are when we drove to the capitol, Suva. Sometimes the road is near the water, other parts it is in the mountains.

Sunset on the beach:

It was an awesome trip. I plan on going again, to this resort, again. We spent a week there, and that seemed about the right amount of time. There's really not much to do, so you'll get bored if there too long.
Bula Fiji!
Click for full post and comments

Wednesday, February 27, 2008

Aspen 2008

So after a couple years of not skiing, my dad set up a fly somewhere to ski trip. This year it was Aspen. And it was awesome. The town is small and hard to get to (the airport is often shut down due to snow) and that makes it all the better for me. I don't like people all that much, so the fact that there are 10 or more ski areas between Denver and Aspen, combined with Aspen having the most expensive lift tickets, means there is hardly anyone actually skiing. The snow was awesome, the weather was OK, but the no people thing really put me over the top. They seem to really do up the town for wintertime:
We (hubby and me) ended up driving with a couple other people from Denver because it was too snowy and foggy to land (the plane made one attempt, but them veered up at the last minute. It was scary.) It was about 5 hours driving sensibly (not terribly slow, not dangerously fast). We got in around 11 pm, just in time to get to the airport and check on our bags. They ended up getting to the Hotel in the morning and finally up to ours rooms before noon.

It was snowy and foggy for skiing Saturday (once I finally got my gear from the airport):
There are some restaurants around, and reservations should be made. Everything is very expensive. Saturday night we ate at Ruth's Chris Steak House, and it might have been better than the other ones I've been to. My parents ate at Olives, the restaurant in the St. Regis, where we stayed. It's small and they liked the food. In the morning this is where they serve breakfast. Sunday night we ate mexican at Blue Maize. I liked the food, and I thought the prices were the most fair I had seen. For breakfast and a lunch we ate at a cafe called Poppycock's. It was very good, but the place can only fit about 10 tables.

Didn't actually get an incredibly huge amount of skiing in, just because I'm lazy and out of shape slob. But it was spread over two days and the military discount was phenomenal. I feel like I got my (dad's) money's worth. The second day of skiing was clearer (you like my mitten in the corner?):

We drove back to Denver too, this it was me, hubby, and my parents. So now hubby is fully initiated into the family, having experienced 5 hours of my mother's complaining and yelling at my dad. Drove through a nice pretty canyon that we didn't see in the dark on Friday:


Then we got to try and find the rental car my dad misplaced in the garage. After a couple hours (our flight out of Denver was delayed, so we had time, while my parents had to hurry) of being driven around by the parking enforcers, the car was finally found and we took it back to the rental place. He says he owes me for that; I wonder if I can get another ski trip out of him? Click for full post and comments

Tuesday, February 5, 2008

more fish stuff

I got my big tank filed up quite a while ago, but never put up a picture of the completed thing, so here it is. There's live plants: Amazon and melon swords, Italian vals, bacopa, and java ferns. Also there are some driftwood pieces that are just awesome. Now a few months after plants the plants (the vals especially) have really taken off. I don't have any CO2 going, so my capacity for plant life will be limited. The melon swords don't seem to be doing so well, but hey are still alive.


The tank is going to be a discus tank, so it limits the types of plants that can be in it. I had moved over my two Bolivian rams, and they seem to really love it in there. Apparently they are male and female, because they made a batch of babies. I couldn't capture them because every day I saw fewer of them. I don't know if they got sucked into the sump, or if Pleco ate them. So now I'm waiting for another batch, and I'll catch them. 

About the cichlid tank: they're all dead. There was a fungal infection, I took out the sick one, treated any secondary bacterial infections with Mycin-II. I should have found some anti-fungal medicine, but I think the pet store didn't have any. Anyway, te infected one did get better in the medicine tank, but eventually died. The rest of the tank is something else: I put a smaller dose of the Mycin-II in the big tank as a prophylactic, but it killed the biological filter, and then all the fish died. It was a total mess, very disgusting. There are two lessons here: don't medicate a tank that's not sick; and use the right medicine.

Lesson learned

But the future discus tank is doing really well, at least.


Click for full post and comments

Monday, November 26, 2007

Rest in Peace, Mittens

I just buried my furry baby. She was 15 years old, had a big cancer in her mouth. Here she is not long ago. Man could a piece of pork get her going!


Bye Bye, baby. Click for full post and comments

Wednesday, November 7, 2007

Getting old sucks


I wouldn't know personally, but Mittens seem to be crankier lately. And little more moist around the mouth. Click for full post and comments

Friday, October 19, 2007

Would you kindly give the Bioshock guys some sort of award?

I finished Halo3, it was beautiful, but short. Now I'm working on Bioshock. It's beautiful too. I'm into the single player campaign modes, so Bioshock is a dream come true. It really shows me what can be done with graphics, sound, etc. when the rest of the disc isn't taken up with co-op mode and extras and shit. Bioshock is what I wished the Halo crew had done from the beginning: make a spectacular campaign mode, put it on its own disc, and put co-op and shit on a whole other disc! Everyone's happy! Don't get me wrong, Halo3 graphics and sound are awesome, but campaign mode's a little short. You know? I was actually starting to not mind the Flood levels because the graphics were so pretty. And squish squish every time MC walked. Awesome!

Anyway, play Bioshock! It's the best game ever! (Seriously, I'm not kidding. It's the best game ever made.) Click for full post and comments

Wednesday, August 29, 2007

New batch of Kenyi

So this weekend I got tired of waiting for the female Kenyi to spit out her babies. I put her in a live-bearer box in the tank, and all the other fish kept hanging around her box and making her very nervous. So I finally just dumped her back in still holding her babies (actually, she had let one go, there was a dead baby floating on the surface of her box). I don't like the idea of stripping (where you physically grab her and open her mouth to force her to spit. I think that's horrible) so I just decided to let whatever happens happen.

Also, I had the five larger babies (a couple are maybe an inch long, some are less than that) in another live-bearer box, and they seemed to be doing pretty well. I got tired of maintaining the littler 5 gallon tank, it was too much trouble, so I put them in the box. And now they are also swimming free like their momma. They are doing well in the open. They all have found hiding places and the other fish seem to leave them alone.

So I was looking in the tank just now, and I saw three tiny babies! I had seen one over the weekend, maybe the day after I put mom back in the open. But now there are three! I wonder how many there really are? I also wonder if they'll make it to adulthood without my interference... Click for full post and comments

Saturday, August 11, 2007

new tank setup: 125gal

I am leak testing my new 125gal AGA I got a couple weeks ago. The tank is going to be planted and full of discus.

Here is a picture of the tank plus sump (30gal). The two overflows are plumbed together with PVC pipe, and the return line is T'd off and connected with just Tygon tubing.

The substrate I have (100 pounds, but isn't in the tank yet) is not rock, not sand, but stuff you mix in with swimming pool plaster. It's by 3M called "Color Quartz." It's actually quartz particles coverd in a ceramic coating. So the color is in the ceramic. There is a wide variety of colors, although the selection depends on what grade you get. S grade is very fine, could be finer than regular sand (I haven't seen it). T grade is what I got and it is coarser than sand (think of two sand grains stuck together). The particles are irregularly shaped, so hopefully that will protect against compaction. I got black, or course, mostly because it's bitchin', but also because the dark substrate will not scare off the discus. The stuff sinks quickly, so it may be vacuumable, on low suction, anyway.

You want to make sure you wash this stuff very well before using it. I did it a little at a time, pouring a little into a 5 gallon bucket and then putting the hose on it. During the first 1-2 washes I noticed a shimmery oily layer on the water, along with the very fine dust that turned the water dark. I wanted to make sure I didn't see any more of that oil in any of my washes, but it didn't take more than maybe 3 washes to get rid of it. I probably did at most 5 washes each batch, making sure the water ran clear. Click for full post and comments

Thursday, August 2, 2007

More fish

Mark the date: the female kenyi has a batch of eggs in her mouth. Her chin has a definite bulge to it. Previous to this was her body looking quite "well fed" and the male chasing her every time she came out of her corner. She was rubbing her body and face against a piece of plant pot. I think this is to clean the surface that the eggs will be laid and inseminated on, then she scoops them up for incubation. I though she just laid the eggs anywhere, but maybe they choose surfaces like the fish who lay their eggs on slate. Anyway, I already have five (was 6, one died) rescued fry from two previous batches. They are growing; I think I'll rescue this next batch, then I think the older ones will be too big to be with new fry. I only have this one extra tank, and it's only like 5 gallons.

I ordered a giant 125g tank for discus and plants. It came today! Reef ready with 30g sump. This is going to take along time to set up because I need everything perfect and established before the discus are added. It will have lots of plants, driftwood (to acidify and soften the water some), probably peat too. I need to see by how much the organic matter will soften my tap water before adding any fish. Click for full post and comments

Wednesday, July 18, 2007

Animal catchup

OK, I know I've neglected the site for a long time. So, time to get back up to date.

Fishes: the 46 bowfront broke a seal in the bottom of the tank, and I was able to only save three of the five cichlids. I lost the Hap and the lemon yellow from stress, because the five fishes were in my two one-gallon buckets all day long while I was at work, buying and then set ting up the new tank: 75 gallons! Probably 15-20 gallons spilled onto the floor and down the air vent into the basement, but I siphoned all the water that could fit into on of my big recycle bins. That was probably 15 gallons of original water. I also saved the gravel, which was nice and dirty. I of course saved the biological filters without washing them. So, in the end, the new 75 gallon tank had maybe 25% original water, with old gravel and all the biological goodness that comes with it, and the sponges already filled with bacteria. I wasn't worried about the water killing the fish, I just needed to get them out of those buckets pronto. The tank was filled with water from an outdoor hose, and was brought up to temperature with hot water from the tap. The Stress Coat was added to dechlorinate, and the fishies added. Three little fish in a 75 gallon tank look pretty funny.

That happened in March, or so. Now it’s July and that tank is filled! The cichlid additions are:
2 Bolivian rams. They only grow to be a few inches, so they may already be adults. I can’t really tell.
1 orange blotch hybrid. Since the male kenyi is clearly the alpha, I’m not sure how bright this guys colors are going to be. Right now he’s a cream base with maybe some orange in it, with brown blotches. He’s pretty the way he is, but some pictures make me think the blotches are supposed to be blue.
1 regular pleco
5 Bosemani rainbows, the smaller ones with yellow rear half
4 Australian rainbows, the larger ones with red/pink fins and tail

Another incident I have had in the past months is a case of ich! It came with the batch of rainbows. I have had ich in the past, and the only method I trust is the now FDA-banned compound Malachite Green mixed with formalin. Malachite Green in a suspected carcinogen, so don’t get any on you, and wash your hands immediately and thoroughly after use. I put in a drop for every gallon, every other day for a five day period (three doses) then wait a couple days and start the five day process again. It took a few series, but the ich as finally killed and I only lost one fish (due to the ich, not the medication). Also, this was before the purchase of the pleco and the other cichlids in the list above. I know plecos (any smooth-skinned fish) are not supposed to be exposed to the M.G./formalin mixture, so I don’t know how the Bolivian rams and orange blotch would have tolerated it.

The two kenyi are a pair, and the female has so far produced two batches of fry. The first batch, even though I could tell she was holding (she didn't eat for a few weeks), I didn't find any fry until there was only one left and it was already well into the free swimming stage, and then I didn't see him anymore because he got eaten. Now this second batch, we were able to suck the four fry into another small tank using my siphon hose. So now they are growing all by themselves; I've left the mother in the tank because 1) they don’t need her anymore, and 2) it would be hard for me and stressful for her for me to try and catch her.

Lizards:
The chameleon is working on a second clutch. She’s been in the cage with the sandbox for a month or more already, but she’s only dug a little. She doesn't seem interested in laying her eggs. I don’t know if she learned anything from her first egg-laying adventure, and maybe she’s doing things smarter, but last time she was digging like crazy. But she still has a voracious appetite, so that’s something.

The gecko had been moved into the 46 bowfront, so now he has glass on all sides of him with a screen top. Now his ceramic heat lamp is inside the cage with him, shining on a slab of marble for him to lay on. He’s also now right at eye-level with the fish, and I swear he watches them sometimes.

So that’s the recap. Right now I'm investigating (again) the possibility of setting up a discus tank. My plan is for a 100-125 gallon tank (with the spill-overs in the back), planted and with driftwood, and a plumbing system to connect the sump to a recirculating line with a reverse osmosis unit connected. The RO unit has a 5 gallon storage tank, and I want a way to be able to feed the unit with the old tank water from the sump (where some the biological filters are) and then squirt in some fresh water from the storage tank. I think what needs to happen is for there to be switches to bypass tank water from the recirculating line to the RO unit for, say, a hour at a time. I don't know any pumping capacities for the inline pumps or the RO, so I don't know how much water is delivered in one hour. I just want to get maybe 10% of the water changed in a day. Even if I got this tank set up tomorrow, I still would have to run it for months with just the plants in it to get everything equilibrated and cycled. But I can dream, can't I? Click for full post and comments

Sunday, April 15, 2007

Washi Bill-holder: Instructions III

The bill-holder:
Here is my schematic I drew up and used for my measurements. (click for full size) The back slot goes all the way to the bottom, and it tall enough for the long envelopes, #10. The second slot goes down to the top of the drawer (tall enough for #6 3/4), so the drawer compartment is totally enclosed and does not go all the way to the back (the drawer is big enough for #10 envelopes). Then the three compartments in the front are for things like stamps, labels, paper clips, whatever and a pen holder. I didn’t measure and cut out the piece for the drawer until the whole thing was put together, because I knew there would be a mistake somewhere and I’d just end up recutting the drawer.
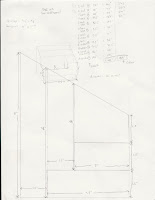
The footprint is more than 6” x 10”; the bottom piece is 6 x 10, but the sides and back come down around the outside of the bottom piece. The only pieces that I doubled the thickness of cardboard were the sides and bottom. In the future, I will make the back double thickness too, because it was a real pain getting that part flat. (The double thick parts stayed flat after they got wet from applying the base paper, because they were thick enough to resist warping. The back, though, got very disfigured after applying the paper, and it was difficult getting a flat heavy thing tucked in there to flatten it as it dried. It took multiple attempts of rewetting and flattening.)

Here is at least one cut-out of each piece needed (except drawer), using the watercolor matte:
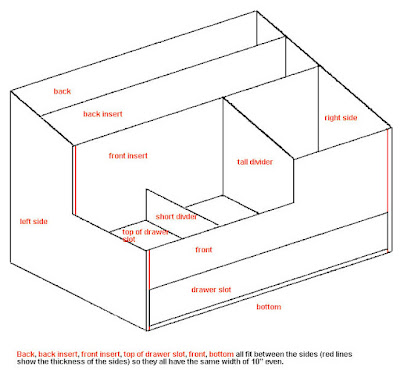
There ar 10 individual pieces, not counting the ones that get 2-ply (back, if you choose, both sides, bottom). Here are my templates with their measurements for each piece. They are notebook paper, so it may be hard to tell where the edge is in some pictures. I would go with the measurements and draw up my own:

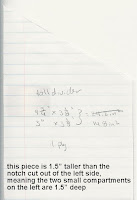
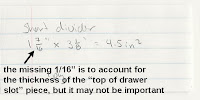





I wrapped the following pieces separately from the unit as a whole: back slot divider, front slot divider, short divider, tall divider, top of draw compartment, front (see diagrams from part II). These were set between large flat heavy things with newspaper so they would dry flat. The rest (two sides, back, and bottom) were taped together (purple is cardboard in the picture)

and a single piece of the base paper was use to cover the outside with tabs to wrap around to the other side of the cardboard.

In hindsight, I could have done the bottom panel as a separate piece, so that I would have tabs from the sides and back pasted to the bottom, and then a separate piece would cover those tabs, the whole bottom, and then a tab would come up around the front into the drawer compartment. So, with all those tabs wrapped around to the inside of the structure, separate pieces are used as facing to cover the tabs.


To get that one big piece of base paper to cover the sides, back, and bottom, I laid the taped-together unit on its back, made an outline with the chalk pencil, carefully rotated it onto a side, made another outline, other side, outline, onto the bottom (so it’s sitting upright now), outline. You end up with a multi-segmented contiguous piece of paper. From the outline you can cut tabs, but it’s better to cut the tabs a little big to make some overlap so the corners get covered well. When cutting the tabs, remember that they’re going to have to go around a 1/8” thick piece of cardboard, so make them on the long side. Making it so that a half inch of tab is actually on the other side of cardboard is fine.

So now the bare-bones unit should be totally covered in base paper: the one big piece on the outside, and the separate ones to cover each face on the inside. Now you can start putting in your individually wrapped dividers that hopefully are still nice and flat. Even though I had very precise measurements (to the 1/16") I just moved the pieces around until they hit both the bottom and the slanted top in the right place. I glued them into place and then used strips of base paper softened in paste the same as if they were pieces of tape. The edges blend in so well that I did this strip method on the front divider piece in plain view (mostly to cover up the seam between this piece and the side) and I can’t see where it is now. So continue with the gluing and the pastey strip method to get all the individual dividers into place. Unsightly seams, joints, unions, whatever, can be covered up with the pastey strip method, with the strips cut to the exact length of the seam to be covered.

Now the only things that should be left are making the actual drawer and putting on the fancy paper. Measure the drawer compartment that remains, and keep in mind that you don’t want too snug of a fit. You can cut the drawer in one piece, and score the four edge to fold up and then tape together. I totally covered the drawer in base paper, but if you want to only do the inside and the first half or so of the front and sides, that’s fine. Just keep in mind what will be visible and what won’t be. I used two pieces of base paper, one for the whole outside, along with tabs like I did for the outside of the larger unit, and then another piece to fit in the bottom and up the sides of the inside of the drawer.


So now hopefully you have the whole thing done and covered in the base paper. We’re in the home stretch! Cut your fancy paper pieces smaller than the face it is covering. I was aiming for something like 1/8” of base paper showing around the edges of the fancy paper. The washi and yuzen papers soak up the paste wonderfully, compared to the black paper I had for the base. Be careful also that the fancy paper doesn’t stretch or expand too much: the long rectangle on the front of the drawer was probably half an inch or more longer wet than it was dry! Apply the same as before, with smoothing from the sponge and wiping off the excess paste. To apply the handles on the drawer I had to drill pilot holes and then screw them in. Sometimes I can just screw them right in without any help (I think this depends on the kind of cardboard).

Yay! You’re done! I hope it’s pretty! Click for full post and comments