I just buried my furry baby. She was 15 years old, had a big cancer in her mouth. Here she is not long ago. Man could a piece of pork get her going!
Bye Bye, baby.
Click for full post and comments
Monday, November 26, 2007
Wednesday, November 7, 2007
Getting old sucks

I wouldn't know personally, but Mittens seem to be crankier lately. And little more moist around the mouth. Click for full post and comments
Friday, October 19, 2007
Would you kindly give the Bioshock guys some sort of award?
I finished Halo3, it was beautiful, but short. Now I'm working on Bioshock. It's beautiful too. I'm into the single player campaign modes, so Bioshock is a dream come true. It really shows me what can be done with graphics, sound, etc. when the rest of the disc isn't taken up with co-op mode and extras and shit. Bioshock is what I wished the Halo crew had done from the beginning: make a spectacular campaign mode, put it on its own disc, and put co-op and shit on a whole other disc! Everyone's happy! Don't get me wrong, Halo3 graphics and sound are awesome, but campaign mode's a little short. You know? I was actually starting to not mind the Flood levels because the graphics were so pretty. And squish squish every time MC walked. Awesome!
Anyway, play Bioshock! It's the best game ever! (Seriously, I'm not kidding. It's the best game ever made.) Click for full post and comments
Anyway, play Bioshock! It's the best game ever! (Seriously, I'm not kidding. It's the best game ever made.) Click for full post and comments
Wednesday, August 29, 2007
New batch of Kenyi
So this weekend I got tired of waiting for the female Kenyi to spit out her babies. I put her in a live-bearer box in the tank, and all the other fish kept hanging around her box and making her very nervous. So I finally just dumped her back in still holding her babies (actually, she had let one go, there was a dead baby floating on the surface of her box). I don't like the idea of stripping (where you physically grab her and open her mouth to force her to spit. I think that's horrible) so I just decided to let whatever happens happen.
Also, I had the five larger babies (a couple are maybe an inch long, some are less than that) in another live-bearer box, and they seemed to be doing pretty well. I got tired of maintaining the littler 5 gallon tank, it was too much trouble, so I put them in the box. And now they are also swimming free like their momma. They are doing well in the open. They all have found hiding places and the other fish seem to leave them alone.
So I was looking in the tank just now, and I saw three tiny babies! I had seen one over the weekend, maybe the day after I put mom back in the open. But now there are three! I wonder how many there really are? I also wonder if they'll make it to adulthood without my interference... Click for full post and comments
Saturday, August 11, 2007
new tank setup: 125gal
I am leak testing my new 125gal AGA I got a couple weeks ago. The tank is going to be planted and full of discus.
Here is a picture of the tank plus sump (30gal). The two overflows are plumbed together with PVC pipe, and the return line is T'd off and connected with just Tygon tubing.
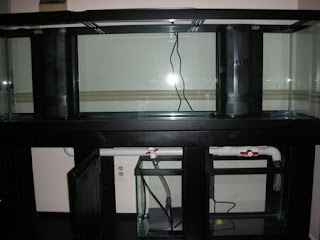
The substrate I have (100 pounds, but isn't in the tank yet) is not rock, not sand, but stuff you mix in with swimming pool plaster. It's by 3M called "Color Quartz." It's actually quartz particles coverd in a ceramic coating. So the color is in the ceramic. There is a wide variety of colors, although the selection depends on what grade you get. S grade is very fine, could be finer than regular sand (I haven't seen it). T grade is what I got and it is coarser than sand (think of two sand grains stuck together). The particles are irregularly shaped, so hopefully that will protect against compaction. I got black, or course, mostly because it's bitchin', but also because the dark substrate will not scare off the discus. The stuff sinks quickly, so it may be vacuumable, on low suction, anyway.
You want to make sure you wash this stuff very well before using it. I did it a little at a time, pouring a little into a 5 gallon bucket and then putting the hose on it. During the first 1-2 washes I noticed a shimmery oily layer on the water, along with the very fine dust that turned the water dark. I wanted to make sure I didn't see any more of that oil in any of my washes, but it didn't take more than maybe 3 washes to get rid of it. I probably did at most 5 washes each batch, making sure the water ran clear. Click for full post and comments
Here is a picture of the tank plus sump (30gal). The two overflows are plumbed together with PVC pipe, and the return line is T'd off and connected with just Tygon tubing.
The substrate I have (100 pounds, but isn't in the tank yet) is not rock, not sand, but stuff you mix in with swimming pool plaster. It's by 3M called "Color Quartz." It's actually quartz particles coverd in a ceramic coating. So the color is in the ceramic. There is a wide variety of colors, although the selection depends on what grade you get. S grade is very fine, could be finer than regular sand (I haven't seen it). T grade is what I got and it is coarser than sand (think of two sand grains stuck together). The particles are irregularly shaped, so hopefully that will protect against compaction. I got black, or course, mostly because it's bitchin', but also because the dark substrate will not scare off the discus. The stuff sinks quickly, so it may be vacuumable, on low suction, anyway.
You want to make sure you wash this stuff very well before using it. I did it a little at a time, pouring a little into a 5 gallon bucket and then putting the hose on it. During the first 1-2 washes I noticed a shimmery oily layer on the water, along with the very fine dust that turned the water dark. I wanted to make sure I didn't see any more of that oil in any of my washes, but it didn't take more than maybe 3 washes to get rid of it. I probably did at most 5 washes each batch, making sure the water ran clear. Click for full post and comments
Thursday, August 2, 2007
More fish
Mark the date: the female kenyi has a batch of eggs in her mouth. Her chin has a definite bulge to it. Previous to this was her body looking quite "well fed" and the male chasing her every time she came out of her corner. She was rubbing her body and face against a piece of plant pot. I think this is to clean the surface that the eggs will be laid and inseminated on, then she scoops them up for incubation. I though she just laid the eggs anywhere, but maybe they choose surfaces like the fish who lay their eggs on slate. Anyway, I already have five (was 6, one died) rescued fry from two previous batches. They are growing; I think I'll rescue this next batch, then I think the older ones will be too big to be with new fry. I only have this one extra tank, and it's only like 5 gallons.
I ordered a giant 125g tank for discus and plants. It came today! Reef ready with 30g sump. This is going to take along time to set up because I need everything perfect and established before the discus are added. It will have lots of plants, driftwood (to acidify and soften the water some), probably peat too. I need to see by how much the organic matter will soften my tap water before adding any fish. Click for full post and comments
I ordered a giant 125g tank for discus and plants. It came today! Reef ready with 30g sump. This is going to take along time to set up because I need everything perfect and established before the discus are added. It will have lots of plants, driftwood (to acidify and soften the water some), probably peat too. I need to see by how much the organic matter will soften my tap water before adding any fish. Click for full post and comments
Wednesday, July 18, 2007
Animal catchup
OK, I know I've neglected the site for a long time. So, time to get back up to date.
Fishes: the 46 bowfront broke a seal in the bottom of the tank, and I was able to only save three of the five cichlids. I lost the Hap and the lemon yellow from stress, because the five fishes were in my two one-gallon buckets all day long while I was at work, buying and then set ting up the new tank: 75 gallons! Probably 15-20 gallons spilled onto the floor and down the air vent into the basement, but I siphoned all the water that could fit into on of my big recycle bins. That was probably 15 gallons of original water. I also saved the gravel, which was nice and dirty. I of course saved the biological filters without washing them. So, in the end, the new 75 gallon tank had maybe 25% original water, with old gravel and all the biological goodness that comes with it, and the sponges already filled with bacteria. I wasn't worried about the water killing the fish, I just needed to get them out of those buckets pronto. The tank was filled with water from an outdoor hose, and was brought up to temperature with hot water from the tap. The Stress Coat was added to dechlorinate, and the fishies added. Three little fish in a 75 gallon tank look pretty funny.
That happened in March, or so. Now it’s July and that tank is filled! The cichlid additions are:
2 Bolivian rams. They only grow to be a few inches, so they may already be adults. I can’t really tell.
1 orange blotch hybrid. Since the male kenyi is clearly the alpha, I’m not sure how bright this guys colors are going to be. Right now he’s a cream base with maybe some orange in it, with brown blotches. He’s pretty the way he is, but some pictures make me think the blotches are supposed to be blue.
1 regular pleco
5 Bosemani rainbows, the smaller ones with yellow rear half
4 Australian rainbows, the larger ones with red/pink fins and tail
Another incident I have had in the past months is a case of ich! It came with the batch of rainbows. I have had ich in the past, and the only method I trust is the now FDA-banned compound Malachite Green mixed with formalin. Malachite Green in a suspected carcinogen, so don’t get any on you, and wash your hands immediately and thoroughly after use. I put in a drop for every gallon, every other day for a five day period (three doses) then wait a couple days and start the five day process again. It took a few series, but the ich as finally killed and I only lost one fish (due to the ich, not the medication). Also, this was before the purchase of the pleco and the other cichlids in the list above. I know plecos (any smooth-skinned fish) are not supposed to be exposed to the M.G./formalin mixture, so I don’t know how the Bolivian rams and orange blotch would have tolerated it.
The two kenyi are a pair, and the female has so far produced two batches of fry. The first batch, even though I could tell she was holding (she didn't eat for a few weeks), I didn't find any fry until there was only one left and it was already well into the free swimming stage, and then I didn't see him anymore because he got eaten. Now this second batch, we were able to suck the four fry into another small tank using my siphon hose. So now they are growing all by themselves; I've left the mother in the tank because 1) they don’t need her anymore, and 2) it would be hard for me and stressful for her for me to try and catch her.
Lizards:
The chameleon is working on a second clutch. She’s been in the cage with the sandbox for a month or more already, but she’s only dug a little. She doesn't seem interested in laying her eggs. I don’t know if she learned anything from her first egg-laying adventure, and maybe she’s doing things smarter, but last time she was digging like crazy. But she still has a voracious appetite, so that’s something.
The gecko had been moved into the 46 bowfront, so now he has glass on all sides of him with a screen top. Now his ceramic heat lamp is inside the cage with him, shining on a slab of marble for him to lay on. He’s also now right at eye-level with the fish, and I swear he watches them sometimes.
So that’s the recap. Right now I'm investigating (again) the possibility of setting up a discus tank. My plan is for a 100-125 gallon tank (with the spill-overs in the back), planted and with driftwood, and a plumbing system to connect the sump to a recirculating line with a reverse osmosis unit connected. The RO unit has a 5 gallon storage tank, and I want a way to be able to feed the unit with the old tank water from the sump (where some the biological filters are) and then squirt in some fresh water from the storage tank. I think what needs to happen is for there to be switches to bypass tank water from the recirculating line to the RO unit for, say, a hour at a time. I don't know any pumping capacities for the inline pumps or the RO, so I don't know how much water is delivered in one hour. I just want to get maybe 10% of the water changed in a day. Even if I got this tank set up tomorrow, I still would have to run it for months with just the plants in it to get everything equilibrated and cycled. But I can dream, can't I? Click for full post and comments
Fishes: the 46 bowfront broke a seal in the bottom of the tank, and I was able to only save three of the five cichlids. I lost the Hap and the lemon yellow from stress, because the five fishes were in my two one-gallon buckets all day long while I was at work, buying and then set ting up the new tank: 75 gallons! Probably 15-20 gallons spilled onto the floor and down the air vent into the basement, but I siphoned all the water that could fit into on of my big recycle bins. That was probably 15 gallons of original water. I also saved the gravel, which was nice and dirty. I of course saved the biological filters without washing them. So, in the end, the new 75 gallon tank had maybe 25% original water, with old gravel and all the biological goodness that comes with it, and the sponges already filled with bacteria. I wasn't worried about the water killing the fish, I just needed to get them out of those buckets pronto. The tank was filled with water from an outdoor hose, and was brought up to temperature with hot water from the tap. The Stress Coat was added to dechlorinate, and the fishies added. Three little fish in a 75 gallon tank look pretty funny.
That happened in March, or so. Now it’s July and that tank is filled! The cichlid additions are:
2 Bolivian rams. They only grow to be a few inches, so they may already be adults. I can’t really tell.
1 orange blotch hybrid. Since the male kenyi is clearly the alpha, I’m not sure how bright this guys colors are going to be. Right now he’s a cream base with maybe some orange in it, with brown blotches. He’s pretty the way he is, but some pictures make me think the blotches are supposed to be blue.
1 regular pleco
5 Bosemani rainbows, the smaller ones with yellow rear half
4 Australian rainbows, the larger ones with red/pink fins and tail
Another incident I have had in the past months is a case of ich! It came with the batch of rainbows. I have had ich in the past, and the only method I trust is the now FDA-banned compound Malachite Green mixed with formalin. Malachite Green in a suspected carcinogen, so don’t get any on you, and wash your hands immediately and thoroughly after use. I put in a drop for every gallon, every other day for a five day period (three doses) then wait a couple days and start the five day process again. It took a few series, but the ich as finally killed and I only lost one fish (due to the ich, not the medication). Also, this was before the purchase of the pleco and the other cichlids in the list above. I know plecos (any smooth-skinned fish) are not supposed to be exposed to the M.G./formalin mixture, so I don’t know how the Bolivian rams and orange blotch would have tolerated it.
The two kenyi are a pair, and the female has so far produced two batches of fry. The first batch, even though I could tell she was holding (she didn't eat for a few weeks), I didn't find any fry until there was only one left and it was already well into the free swimming stage, and then I didn't see him anymore because he got eaten. Now this second batch, we were able to suck the four fry into another small tank using my siphon hose.
 So now they are growing all by themselves; I've left the mother in the tank because 1) they don’t need her anymore, and 2) it would be hard for me and stressful for her for me to try and catch her.
Lizards:
The chameleon is working on a second clutch. She’s been in the cage with the sandbox for a month or more already, but she’s only dug a little. She doesn't seem interested in laying her eggs. I don’t know if she learned anything from her first egg-laying adventure, and maybe she’s doing things smarter, but last time she was digging like crazy. But she still has a voracious appetite, so that’s something.
The gecko had been moved into the 46 bowfront, so now he has glass on all sides of him with a screen top. Now his ceramic heat lamp is inside the cage with him, shining on a slab of marble for him to lay on. He’s also now right at eye-level with the fish, and I swear he watches them sometimes.
So that’s the recap. Right now I'm investigating (again) the possibility of setting up a discus tank. My plan is for a 100-125 gallon tank (with the spill-overs in the back), planted and with driftwood, and a plumbing system to connect the sump to a recirculating line with a reverse osmosis unit connected. The RO unit has a 5 gallon storage tank, and I want a way to be able to feed the unit with the old tank water from the sump (where some the biological filters are) and then squirt in some fresh water from the storage tank. I think what needs to happen is for there to be switches to bypass tank water from the recirculating line to the RO unit for, say, a hour at a time. I don't know any pumping capacities for the inline pumps or the RO, so I don't know how much water is delivered in one hour. I just want to get maybe 10% of the water changed in a day. Even if I got this tank set up tomorrow, I still would have to run it for months with just the plants in it to get everything equilibrated and cycled. But I can dream, can't I? Click for full post and comments
Sunday, April 15, 2007
Washi Bill-holder: Instructions III
The bill-holder:
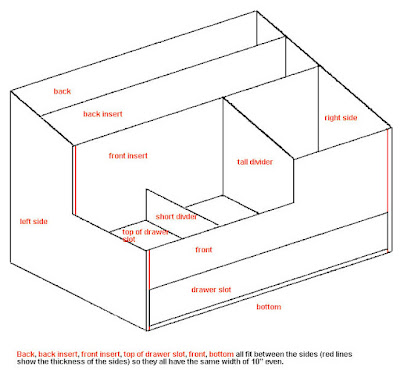
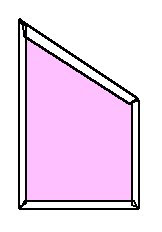
Here is my schematic I drew up and used for my measurements. (click for full size)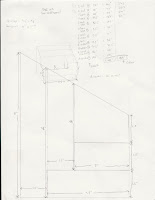 The back slot goes all the way to the bottom, and it tall enough for the long envelopes, #10. The second slot goes down to the top of the drawer (tall enough for #6 3/4), so the drawer compartment is totally enclosed and does not go all the way to the back (the drawer is big enough for #10 envelopes). Then the three compartments in the front are for things like stamps, labels, paper clips, whatever and a pen holder. I didn’t measure and cut out the piece for the drawer until the whole thing was put together, because I knew there would be a mistake somewhere and I’d just end up recutting the drawer.
The footprint is more than 6” x 10”; the bottom piece is 6 x 10, but the sides and back come down around the outside of the bottom piece. The only pieces that I doubled the thickness of cardboard were the sides and bottom. In the future, I will make the back double thickness too, because it was a real pain getting that part flat. (The double thick parts stayed flat after they got wet from applying the base paper, because they were thick enough to resist warping. The back, though, got very disfigured after applying the paper, and it was difficult getting a flat heavy thing tucked in there to flatten it as it dried. It took multiple attempts of rewetting and flattening.)
Here is at least one cut-out of each piece needed (except drawer), using the watercolor matte:
 There ar 10 individual pieces, not counting the ones that get 2-ply (back, if you choose, both sides, bottom). Here are my templates with their measurements for each piece. They are notebook paper, so it may be hard to tell where the edge is in some pictures. I would go with the measurements and draw up my own:


I wrapped the following pieces separately from the unit as a whole: back slot divider, front slot divider, short divider, tall divider, top of draw compartment, front (see diagrams from part II). These were set between large flat heavy things with newspaper so they would dry flat. The rest (two sides, back, and bottom) were taped together (purple is cardboard in the picture)

and a single piece of the base paper was use to cover the outside with tabs to wrap around to the other side of the cardboard.

In hindsight, I could have done the bottom panel as a separate piece, so that I would have tabs from the sides and back pasted to the bottom, and then a separate piece would cover those tabs, the whole bottom, and then a tab would come up around the front into the drawer compartment. So, with all those tabs wrapped around to the inside of the structure, separate pieces are used as facing to cover the tabs.


To get that one big piece of base paper to cover the sides, back, and bottom, I laid the taped-together unit on its back, made an outline with the chalk pencil, carefully rotated it onto a side, made another outline, other side, outline, onto the bottom (so it’s sitting upright now), outline. You end up with a multi-segmented contiguous piece of paper. From the outline you can cut tabs, but it’s better to cut the tabs a little big to make some overlap so the corners get covered well. When cutting the tabs, remember that they’re going to have to go around a 1/8” thick piece of cardboard, so make them on the long side. Making it so that a half inch of tab is actually on the other side of cardboard is fine.
So now the bare-bones unit should be totally covered in base paper: the one big piece on the outside, and the separate ones to cover each face on the inside. Now you can start putting in your individually wrapped dividers that hopefully are still nice and flat. Even though I had very precise measurements (to the 1/16") I just moved the pieces around until they hit both the bottom and the slanted top in the right place. I glued them into place and then used strips of base paper softened in paste the same as if they were pieces of tape. The edges blend in so well that I did this strip method on the front divider piece in plain view (mostly to cover up the seam between this piece and the side) and I can’t see where it is now. So continue with the gluing and the pastey strip method to get all the individual dividers into place. Unsightly seams, joints, unions, whatever, can be covered up with the pastey strip method, with the strips cut to the exact length of the seam to be covered.
Now the only things that should be left are making the actual drawer and putting on the fancy paper. Measure the drawer compartment that remains, and keep in mind that you don’t want too snug of a fit. You can cut the drawer in one piece, and score the four edge to fold up and then tape together. I totally covered the drawer in base paper, but if you want to only do the inside and the first half or so of the front and sides, that’s fine. Just keep in mind what will be visible and what won’t be. I used two pieces of base paper, one for the whole outside, along with tabs like I did for the outside of the larger unit, and then another piece to fit in the bottom and up the sides of the inside of the drawer.


So now hopefully you have the whole thing done and covered in the base paper. We’re in the home stretch! Cut your fancy paper pieces smaller than the face it is covering. I was aiming for something like 1/8” of base paper showing around the edges of the fancy paper. The washi and yuzen papers soak up the paste wonderfully, compared to the black paper I had for the base. Be careful also that the fancy paper doesn’t stretch or expand too much: the long rectangle on the front of the drawer was probably half an inch or more longer wet than it was dry! Apply the same as before, with smoothing from the sponge and wiping off the excess paste. To apply the handles on the drawer I had to drill pilot holes and then screw them in. Sometimes I can just screw them right in without any help (I think this depends on the kind of cardboard).
Yay! You’re done! I hope it’s pretty! Click for full post and comments
Here is my schematic I drew up and used for my measurements. (click for full size)
 The back slot goes all the way to the bottom, and it tall enough for the long envelopes, #10. The second slot goes down to the top of the drawer (tall enough for #6 3/4), so the drawer compartment is totally enclosed and does not go all the way to the back (the drawer is big enough for #10 envelopes). Then the three compartments in the front are for things like stamps, labels, paper clips, whatever and a pen holder. I didn’t measure and cut out the piece for the drawer until the whole thing was put together, because I knew there would be a mistake somewhere and I’d just end up recutting the drawer.
The footprint is more than 6” x 10”; the bottom piece is 6 x 10, but the sides and back come down around the outside of the bottom piece. The only pieces that I doubled the thickness of cardboard were the sides and bottom. In the future, I will make the back double thickness too, because it was a real pain getting that part flat. (The double thick parts stayed flat after they got wet from applying the base paper, because they were thick enough to resist warping. The back, though, got very disfigured after applying the paper, and it was difficult getting a flat heavy thing tucked in there to flatten it as it dried. It took multiple attempts of rewetting and flattening.)
Here is at least one cut-out of each piece needed (except drawer), using the watercolor matte:
 There ar 10 individual pieces, not counting the ones that get 2-ply (back, if you choose, both sides, bottom). Here are my templates with their measurements for each piece. They are notebook paper, so it may be hard to tell where the edge is in some pictures. I would go with the measurements and draw up my own:


I wrapped the following pieces separately from the unit as a whole: back slot divider, front slot divider, short divider, tall divider, top of draw compartment, front (see diagrams from part II). These were set between large flat heavy things with newspaper so they would dry flat. The rest (two sides, back, and bottom) were taped together (purple is cardboard in the picture)


To get that one big piece of base paper to cover the sides, back, and bottom, I laid the taped-together unit on its back, made an outline with the chalk pencil, carefully rotated it onto a side, made another outline, other side, outline, onto the bottom (so it’s sitting upright now), outline. You end up with a multi-segmented contiguous piece of paper. From the outline you can cut tabs, but it’s better to cut the tabs a little big to make some overlap so the corners get covered well. When cutting the tabs, remember that they’re going to have to go around a 1/8” thick piece of cardboard, so make them on the long side. Making it so that a half inch of tab is actually on the other side of cardboard is fine.
So now the bare-bones unit should be totally covered in base paper: the one big piece on the outside, and the separate ones to cover each face on the inside. Now you can start putting in your individually wrapped dividers that hopefully are still nice and flat. Even though I had very precise measurements (to the 1/16") I just moved the pieces around until they hit both the bottom and the slanted top in the right place. I glued them into place and then used strips of base paper softened in paste the same as if they were pieces of tape. The edges blend in so well that I did this strip method on the front divider piece in plain view (mostly to cover up the seam between this piece and the side) and I can’t see where it is now. So continue with the gluing and the pastey strip method to get all the individual dividers into place. Unsightly seams, joints, unions, whatever, can be covered up with the pastey strip method, with the strips cut to the exact length of the seam to be covered.
Now the only things that should be left are making the actual drawer and putting on the fancy paper. Measure the drawer compartment that remains, and keep in mind that you don’t want too snug of a fit. You can cut the drawer in one piece, and score the four edge to fold up and then tape together. I totally covered the drawer in base paper, but if you want to only do the inside and the first half or so of the front and sides, that’s fine. Just keep in mind what will be visible and what won’t be. I used two pieces of base paper, one for the whole outside, along with tabs like I did for the outside of the larger unit, and then another piece to fit in the bottom and up the sides of the inside of the drawer.


So now hopefully you have the whole thing done and covered in the base paper. We’re in the home stretch! Cut your fancy paper pieces smaller than the face it is covering. I was aiming for something like 1/8” of base paper showing around the edges of the fancy paper. The washi and yuzen papers soak up the paste wonderfully, compared to the black paper I had for the base. Be careful also that the fancy paper doesn’t stretch or expand too much: the long rectangle on the front of the drawer was probably half an inch or more longer wet than it was dry! Apply the same as before, with smoothing from the sponge and wiping off the excess paste. To apply the handles on the drawer I had to drill pilot holes and then screw them in. Sometimes I can just screw them right in without any help (I think this depends on the kind of cardboard).
Yay! You’re done! I hope it’s pretty! Click for full post and comments
Washi Bill-holder: Instructions II
The technique:
You will use two pieces of base paper to cover one piece of cardboard. Lay your piece of cardboard down onto the back of your base paper and make an outline. Roughly cut this out keeping in mind that you want tabs on all sides of the piece of cardboard to wrap around the other side.
Cut tabs.
 Fold tabs around to back side, trying to cover the corners also.
 Cut out another piece of base paper that will go on the opposite side of the first piece that had tabs (so it will be a mirror image, if an awkwardly shaped piece). This piece of base paper is to be cut just slightly smaller than the actual dimensions of the cardboard piece, because you want the edges of the paper firmly pasted in place. If an edge is exposed, it is not only ugly, but it allows for the possibility of damage by ripping.
 This is why cutting the tabs big on the first piece of paper is a good idea: some overlap as you come around the edges can cover up the corners, and also cover up the area just outside the reach of the second piece of paper (between its corner and the corner of the cardboard). To get the paper to stick to the cardboard, liberally apply the paste with finger or sponge, smooth it out some, and let it soak in for a minute. This part really depends on the type of paper you have. The black paper on a roll I had was thick, but softened after letting the paste sit for a minute of two. Also, apply paste to front and back so it can soak in for both directions. With most of the excess off (you don’t need it dripping) lay the paper onto the cardboard and use your finger or sponge to smooth out bubbles. Get the tabs wrapped around the other side, and make adjustments to get the corners covered up. You’ll find that the soft paper really yields to the folds and adjustments you need it to make. Do the same thing for the smaller piece of paper, and get the side with the tabs covered up. Smooth out bubbles and wipe off excess paste (I use either a dry sponge, paper towel, of sponge with just a hint of water). Put this under a large flat heavy thing with some newspaper to get it dry and flat. You’ll have to change out the newspaper in an hour, then the second newspaper is probably good for a week). I had my pieces in the flattener for a week, because that was the next time I could get to the project, and it worked perfectly.
Click for full post and comments
This is why cutting the tabs big on the first piece of paper is a good idea: some overlap as you come around the edges can cover up the corners, and also cover up the area just outside the reach of the second piece of paper (between its corner and the corner of the cardboard). To get the paper to stick to the cardboard, liberally apply the paste with finger or sponge, smooth it out some, and let it soak in for a minute. This part really depends on the type of paper you have. The black paper on a roll I had was thick, but softened after letting the paste sit for a minute of two. Also, apply paste to front and back so it can soak in for both directions. With most of the excess off (you don’t need it dripping) lay the paper onto the cardboard and use your finger or sponge to smooth out bubbles. Get the tabs wrapped around the other side, and make adjustments to get the corners covered up. You’ll find that the soft paper really yields to the folds and adjustments you need it to make. Do the same thing for the smaller piece of paper, and get the side with the tabs covered up. Smooth out bubbles and wipe off excess paste (I use either a dry sponge, paper towel, of sponge with just a hint of water). Put this under a large flat heavy thing with some newspaper to get it dry and flat. You’ll have to change out the newspaper in an hour, then the second newspaper is probably good for a week). I had my pieces in the flattener for a week, because that was the next time I could get to the project, and it worked perfectly.
Click for full post and comments
You will use two pieces of base paper to cover one piece of cardboard. Lay your piece of cardboard down onto the back of your base paper and make an outline.
 Roughly cut this out keeping in mind that you want tabs on all sides of the piece of cardboard to wrap around the other side.
Cut tabs.
 Fold tabs around to back side, trying to cover the corners also.
 Cut out another piece of base paper that will go on the opposite side of the first piece that had tabs (so it will be a mirror image, if an awkwardly shaped piece). This piece of base paper is to be cut just slightly smaller than the actual dimensions of the cardboard piece, because you want the edges of the paper firmly pasted in place. If an edge is exposed, it is not only ugly, but it allows for the possibility of damage by ripping.
 This is why cutting the tabs big on the first piece of paper is a good idea: some overlap as you come around the edges can cover up the corners, and also cover up the area just outside the reach of the second piece of paper (between its corner and the corner of the cardboard). To get the paper to stick to the cardboard, liberally apply the paste with finger or sponge, smooth it out some, and let it soak in for a minute. This part really depends on the type of paper you have. The black paper on a roll I had was thick, but softened after letting the paste sit for a minute of two. Also, apply paste to front and back so it can soak in for both directions. With most of the excess off (you don’t need it dripping) lay the paper onto the cardboard and use your finger or sponge to smooth out bubbles. Get the tabs wrapped around the other side, and make adjustments to get the corners covered up. You’ll find that the soft paper really yields to the folds and adjustments you need it to make. Do the same thing for the smaller piece of paper, and get the side with the tabs covered up. Smooth out bubbles and wipe off excess paste (I use either a dry sponge, paper towel, of sponge with just a hint of water). Put this under a large flat heavy thing with some newspaper to get it dry and flat. You’ll have to change out the newspaper in an hour, then the second newspaper is probably good for a week). I had my pieces in the flattener for a week, because that was the next time I could get to the project, and it worked perfectly.
Click for full post and comments
This is why cutting the tabs big on the first piece of paper is a good idea: some overlap as you come around the edges can cover up the corners, and also cover up the area just outside the reach of the second piece of paper (between its corner and the corner of the cardboard). To get the paper to stick to the cardboard, liberally apply the paste with finger or sponge, smooth it out some, and let it soak in for a minute. This part really depends on the type of paper you have. The black paper on a roll I had was thick, but softened after letting the paste sit for a minute of two. Also, apply paste to front and back so it can soak in for both directions. With most of the excess off (you don’t need it dripping) lay the paper onto the cardboard and use your finger or sponge to smooth out bubbles. Get the tabs wrapped around the other side, and make adjustments to get the corners covered up. You’ll find that the soft paper really yields to the folds and adjustments you need it to make. Do the same thing for the smaller piece of paper, and get the side with the tabs covered up. Smooth out bubbles and wipe off excess paste (I use either a dry sponge, paper towel, of sponge with just a hint of water). Put this under a large flat heavy thing with some newspaper to get it dry and flat. You’ll have to change out the newspaper in an hour, then the second newspaper is probably good for a week). I had my pieces in the flattener for a week, because that was the next time I could get to the project, and it worked perfectly.
Click for full post and comments
Washi Bill-holder: Instructions I
First, the main idea of this type of project is to cover ordinary cardboard with pretty paper. Traditionally this is done with organic pastes (rice flour or wheat flour and water) and papers especially designed for the task, called Washi and Yuzen. Think decoupage, but Oriental and therefore classier. The pieces I have seen around the internet have a base paper of some solid color, usually black, with the washi or yuzen "fancy paper" put on in certain places for accent.
So, you first have to start with a cardboard object. You can find boxes and such at a craft store like Michael's. I prefer to make my own cardboard objects. My first washi project was a small three-drawered jewelry box, and this bill-holder is my second project. (You can also find really simple pre-fab projects with self-adhesive paper and cardboard and instructions included. Normally you would have your whole object put together first (cardboard held together by masking tape, not glued) and then cover the object as a whole with the black paper. This means you have to really plan out the shape of this one big piece of paper, where all the notches are, how things get folded over, etc.
Supplies:
cardboard
paper
paste
sponge
newspaper
large flat heavy things for flattening
exacto knife
pencil
ruler
masking tape
Cardboard for your object: With smaller projects if you keep the cardboard that comes with your origami paper you can use that. With some packs of paper I got cardboard that was upwards of 1/8" thick. The size of this project though, forced me to go looking for cardboard whole-salers. No luck for 1/8", but I did find watercolor matte at Michael's that comes 2' x 3', and is 1/16” thick. I first cut out all the pieces I needed and then glued together the ones I wanted to be 1/8” thick
What paper to use: If your object is small enough, the large size origami paper works well for the base black paper. Once everything is pasted down, it is very difficult to see seams or overlaps of paper. Even if you can't see the overlaps, I still like cover as much (all) surface area as possible with one piece of paper. So, my bill-holder was too big for the large origami paper, so I found a roll of black paper at Michael's. I'm not sure what it's for, maybe scrapbooking or something. It's rather thick, and I would say it's the thickest paper you'd ever want to use in washi projects. (paper softens up with the paste, but this stuff almost not enough). Whatever paper you find, make sure it isn't too waxy, like the generic origami paper. This stuff still soaks up the paste eventually, but once you see how washi or yuzen paper reacts to the paste you'll understand. Once you have the base paper selected, you have to find a fancy paper. Again, if you project is small enough, you can find origami paper (the good kind, not generic) that will fit your accent spaces. If not, like this bill-holder, you have find paper in 3' x 4' sheets. Find a pattern and color you find pleasing. This is why I find the black base paper the most attractive. You don't have to worry about clashing colors between the base and the fancy papers. The black paper recedes into the background and makes the fancy paper the focus.
Paste: I hear you can buy the right kind of paste already made up, but making it is so easy that I don't bother. I use wheat flour, like the kind for baking. 1:7 ratio of flour:water. I do this is teaspoons and it makes a good volume to work with. Cook this on the stove on low heat with constant stirring. After a while (depends on how fast your stove is) you'll see the mixture go from the flour simply suspended in the water to actually a homogenous solution. It'll get thicker, has a translucent look to it, and I usually let it go until it has boiled for maybe a minute. Then I take it off the heat, let it cool some, and decide if the consistency is right. I usually end up throwing in one more teaspoon of water at this point to thin it down just a touch. For consistency keep this in mind: if there is too much flour in the paste, it will not give a transparent finish, especially against black paper. If there is too little flour in the paste, it won't act like a paste!
**The paste does go bad! You can keep it in the fridge, but it probably won't last even a week that way. It's easy to make, so no big deal.**
Sponge, newspaper: Sponge for applying the paste and wiping off excess and giving a wipe down after the paper is applied (working out air bubbles, etc.). Newspaper for soaking up the moisture. You can lay your paper to be pasted out on the newspaper, apply the paste while going over the edges and not have to worry about it.
Large flat heavy things: I happened to have 1’ x 1’ marble tile in the garage and boxes of ammo for weight, This combination worked excellently to flatten pieces as they dried. (another use for the newspaper here: to soak up moisture in the flattening process.)
Exacto knife: A sharp blade cuts the watercolor matte fairly well. I did two slices along the ruler as a straight-edge, then the track was deep enough to not need the straight-edge anymore
Pencil: Regular one for the fancy paper (it’s white on the back), but had to use the white chalk pencil (for sewing) on the black paper.
Ruler: Any straight edge with markings, and also a triangle or T-square to get right-angles.
Masking tape: This works well for putting the cardboard together. I had a roll that was 2” wide and very thin tape. So thin that is was hard to tear off the roll.
To be continued... Click for full post and comments
Tuesday, March 27, 2007
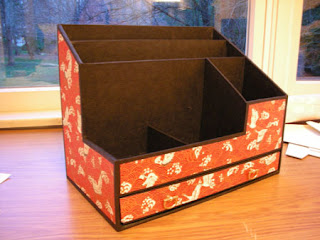
Washi project--Bill organizer
I don't know what you call these things, but I just finished this. I will put together instructions soon. The fancy paper is from Japan, and the black paper is some wrapping paper or craft paper or something that came on a roll from Michael's.
 Click for full post and comments
 Click for full post and comments
Tuesday, March 6, 2007
My zoo
So I decided against the undergravel filter on my fish tank. I kept the filter in place, and all that gravel, but took off the powerhead. I just wasn't happy with how it was moving the water (too much current, and not enough agitation on the surface). So, now the tube that the powerhead was attached to has an airline with an airstone pushed all the way to the bottom, so I have some bubble action, and a new Wisper power filter. The kind with two baskets hanging over the back. I had that same one before taking the tank down to move, and I was really happy with it. That kind of filter, with the carbon and the white fiberfill is really easy to change. So, with a new filter in place and the tank having sat for like two months cycling, I finally got some critter to put in. This is going to be a Cichlid tank. I have 5 so far, and two that I have read that shouldn't be mixed but I've had the Yellow Labs before and just love those guys! Anyway, the list:
1 Yellow Lab, also electric yellow, also lemon yellow (the shit-stirrer)
Labidochromis caeruleus
Malawi Mbuna
1 Hap Ahli, also electric blue (the one that shouldn't be mixed with an mbuna, and I have three!)
Sciaenochromis fryeri
Malawi Haplochromis
2 Kenyi, male and female
Metriaclima lombardoi
Malawi Mbuna
1 Dutch Orange (the oddball, being from a different lake)
Neolamprologus leleupi
Tanganikya Laprologines
There is the so-called "shit-stirrer" in there because, aside from the fact that I just love 'em, they can stir up the pecking order to induce good color from the male competitors, namely the Hap. Even though the site those links are to says that the mbunas are too aggressive for the Haps, I have had experience with the lemon yellows and they didn't seem that aggressive to me (now the Brichardis during breeding, look out! The lemon yellows were in the corners the whole time the Brichardis were breeding, which was often. But that was my last tank.) Apparently you want enough aggression in some other fish in the tank to induce the competitive spirit, so the Alpha can be determined. But, you don't want a fish that will harass so much that the others are automatically the submissives (like if one was much bigger than all the rest. You need to match sizes). You want competition. Also, you don't want actual fighting, because that will lead to injury.
So far I've seen normal getting-to-know-the-tank swimming around, and sure sometimes someone get chased, but I haven't yet seen one fish totally dominating the others. They've only just figured out that the one who sticks her fat face in the window is the one who gives food. Oh yeah, that's another thing. Some of these fish are herbs, some are omnis, and some are carnivores. So, I only had algae pellets (veggie) for a pleco, shrimp pellets (meat), and flakes (?). The two types of pellets sink, meaning cichlids will be attracted to it, and they won't touch the flakes or any other food that floats. So I found some slow-sinking "for all cichlids" food. It's perfect because the shrimp pellet sank so fast they didn't notice it. The slow-sinking stuff though, sinks at the right rate for them to notice and gobble it up.
The fish are young and don't have all their color yet, so I'm excited to see how they turn out! Click for full post and comments
Saturday, March 3, 2007
yummy
You know what's really tasty? Mocha Frappuccino poured over Coco Krispies when you're out of milk. Hey, there's some milk product in a Frapp. And man does it get you going in the morning.
Click for full post and comments
Monday, February 26, 2007
I must have good taste...
...in fish. I saw a beautiful Blue Ahli at the pet store today while getting crickets. I went home to get the cricket set up, eat dinner, and look up some info on Haps. I am an experienced Cichlid keeper, but I don't know anything about Haps. So, after making the decision to get him while he was still looking good (this was PetSmart, so who knows how long he would have survived) I raced out the door. When I got there the ladder was set up at that tank (his was on the top) and he was gone! Foxit!!
Click for full post and comments
Sunday, February 25, 2007
Merry Christmas! oh wait...
I have been waiting to get a picture of snow on our holly tree, but it's always happened in the early evening when the light is fading. Today it was snowing most of the daylight hours, so I finally got a picture. Click for full post and comments
 Click for full post and comments
Friday, February 23, 2007
Seven years bad luck
My mosaic mirror has been hanging on the wall for the first time ever for about a month. It cracked. The mirror part, no the grout. My guess it that it wasn't designed to hold it's weight and there were stresses in it. I had epoxied the glass to that particle board stuff with the holes in it. I guess I didn't realize epoxy would not expand and contract enough to join these two different materials together. So, my plan is to either place a mirror over the cracked one inside the recessed area, or try to chisel out the cracked part. The first one sounds easiest, by far.
Click for full post and comments
Sunday, February 18, 2007
Excavation of the eggs
In what turned out to be an all day project, I cleaned out the chameleon's old cage and set her up in a new, taller cage. I took out the sand box and got the eggs out. Now, I'm glad I knew the eggs weren't fertile, because it gave me some liberty with how I handled the eggs. They have soft shells, so they can get squished if digging recklessly. Also, I have read that when you dig up fertile eggs for hatching that you want to separate them and arrange them so they are facing exactly "up" as you found them (mark "up" with a pen when each is uncovered.)
So, here is my practice for if I ever feel like breeding a lizard:
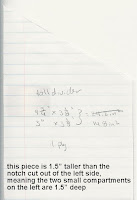
The original layout of the sandbox was a bilayer system. I carved out a little section on one side and filled in the other side with that sand, so there was a little lower section for the lizard to actually fit in for digging. Just so she wasn't sitting on top of the sandbox exposed. The original lower section and tunnel entrance is shaded grey in the picture below. It all got a little destroyed when she filled in everything. The original sand structure was very densely packed; it worked great for this. The tunnels, once dug, did not dry out and cave in as I feared. In fact, the sand at the very bottom of the box was very wet still, almost dripping.
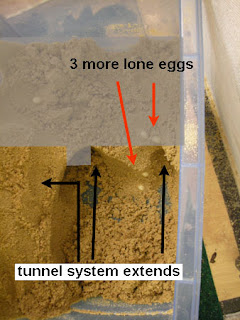
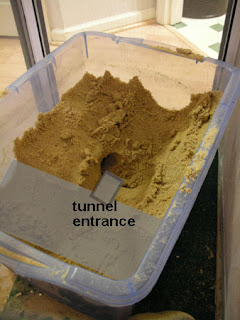 As I was digging I could feel the looser dirt, where she had made tunnels. Her system was more extensive than I had thought. Her clutch ended up being back underneath the original lower area (so there were only scant inches of roof).
So this picture is in the same orientation as the one above, where the egg on the left is just above where her clutch is (though I didn't know it at the time). The egg on the right seems to be a truly lone outlier. Like she was still crapping them out as she was filling in the hole. The depression between the eggs is tunnel:

Now the orientation has rotated 180°. The original lower area of the sandbox is now at the top, in the shaded area. The egg on the left in the above photo is present in this one too, the topmost one of the groups of four. It looks like there were two sections of tunnel that went back underneath the lower area, and one short section that went off the the side:
Here the edge of the clutch has finally been uncovered.
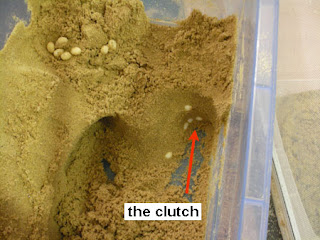
And here is the clutch intact:
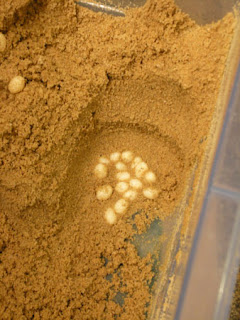
There were 23 eggs total, which is perfect. I thought I remember reading the average size for a veiled chameleon is 15-30 eggs, but I could be wrong. I just hope she wasn't too traumatized by her removal from the cage and my throwing her babies in the trash. I don't know, maybe she knew they weren't going to hatch. She'll forgive me when I throw in some crickeys. She always does. Click for full post and comments
So, here is my practice for if I ever feel like breeding a lizard:
The original layout of the sandbox was a bilayer system. I carved out a little section on one side and filled in the other side with that sand, so there was a little lower section for the lizard to actually fit in for digging. Just so she wasn't sitting on top of the sandbox exposed. The original lower section and tunnel entrance is shaded grey in the picture below. It all got a little destroyed when she filled in everything. The original sand structure was very densely packed; it worked great for this. The tunnels, once dug, did not dry out and cave in as I feared. In fact, the sand at the very bottom of the box was very wet still, almost dripping.
 As I was digging I could feel the looser dirt, where she had made tunnels. Her system was more extensive than I had thought. Her clutch ended up being back underneath the original lower area (so there were only scant inches of roof).
So this picture is in the same orientation as the one above, where the egg on the left is just above where her clutch is (though I didn't know it at the time). The egg on the right seems to be a truly lone outlier. Like she was still crapping them out as she was filling in the hole. The depression between the eggs is tunnel:

Now the orientation has rotated 180°. The original lower area of the sandbox is now at the top, in the shaded area. The egg on the left in the above photo is present in this one too, the topmost one of the groups of four. It looks like there were two sections of tunnel that went back underneath the lower area, and one short section that went off the the side:

Here the edge of the clutch has finally been uncovered.

And here is the clutch intact:

There were 23 eggs total, which is perfect. I thought I remember reading the average size for a veiled chameleon is 15-30 eggs, but I could be wrong. I just hope she wasn't too traumatized by her removal from the cage and my throwing her babies in the trash. I don't know, maybe she knew they weren't going to hatch. She'll forgive me when I throw in some crickeys. She always does. Click for full post and comments
Saturday, February 17, 2007
She's thin again
Yesterday and today I noticed the chameleon looked skinnier. I guess she belly has shrunk back down, but now I think she looks weird.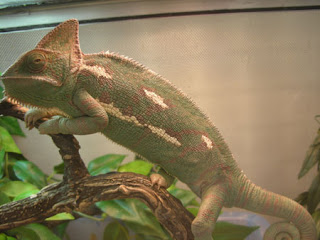
I think now her head looks to big for her body. But I noticed her spots are bright again, so she must think she's guarding babies. Poor thing. One question I have about this whole thing, though: those eggs are buried like 6 inches under sand. How in the hell are those little things supposed to hatch and get out? Without suffocating? If she had laid actual fertile eggs, that is. Click for full post and comments

I think now her head looks to big for her body. But I noticed her spots are bright again, so she must think she's guarding babies. Poor thing. One question I have about this whole thing, though: those eggs are buried like 6 inches under sand. How in the hell are those little things supposed to hatch and get out? Without suffocating? If she had laid actual fertile eggs, that is. Click for full post and comments
Thursday, February 15, 2007
Lizzy did it!
I think the chameleon has laid her eggs. Yesterday she spent the entire day underground, after digging her tunnel all the way to the bottom of the container and then off to the side (she made a little view hole like in the zoo). But the view hole got covered up again, so I couldn't watch. Also, I could hear her scratching away underground. It was pretty weird. Anyway, as I wondered how many days of not seeing her until I dig out a dead chameleon, I saw her working on covering up her hole.
I think she still looks big, but more hollow. Like droopy or something.

So this weekend I will take the box of sand out and clean up her mess. There is sand everywhere. I'm not gonna waste it, though, I'm gonna sift that shit and find those eggs! I have a feeling she will be, uh, displeased, to say the least when I yank her out of there for the cleaning.
Also, notice her coloring seems to be calm again. I noticed her coloration mellowing out a couple days ago. The formerly white spots have been that tan color for a few days now. Click for full post and comments
Wednesday, February 14, 2007
Snow
Work was cancelled due to the storm that hit the central Eastern Seaboard. So, banks closed early yesterday, etc. And after it sleeted hard all last night we got the call that work was cancelled. I pretty much could have figured that, since everyone left as soon as it got cruddy yesterday. So, while not working at a fun job, I shovelled about half the driveway. My husband got to do the rest. But, the good news is that since we live in the city limits our streets get plowed. Bad news is that it makes shovelling the driveway harder.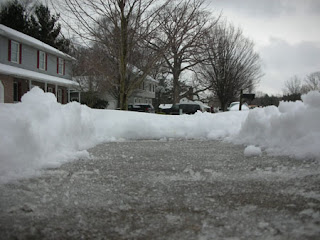
It was about 3 inches of wet, icy, compacted snow. In some places I was walking on top on the snow. So, I got tired pretty fast. Click for full post and comments

It was about 3 inches of wet, icy, compacted snow. In some places I was walking on top on the snow. So, I got tired pretty fast. Click for full post and comments
Look what fits inside the Shuttle!

My husband ordered his computer setup including the new video card for me. It's pretty much the same as what I had already got except the 256MB version. So this one now is an ATI Radeon x1950 Pro 256MB GDDR3, and is Vista ready, for what idiots are actually going to switch already. It's still the x16 PCI-E like the 512MB version. I'm kinda pissed because the only spec I really cared about was the memory. I wanted the 512 meg one. Foxit. (my new swear word, remember)
In other tech news I'm trying to convince my husband to take my RAZR (which I love, it's an awesome phone) so that I can buy a RIZR. Not yet available in the US, I don't think, but only around $250 for an unlocked one. (I got my RAZR from a site that I can't remember the name and can't find anywhere. It came from Germany, and was in German until it found the Cingular signal.) The RIZR takes a microSD card for a couple gigs of songs. It capture video and the same 2MP camera that seems to have not evolved woth the rest of the technology. It's a purdy phone and I want one. Click for full post and comments
Saturday, February 10, 2007
Driving trip 2005
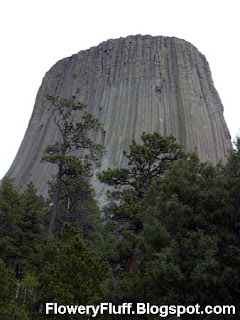
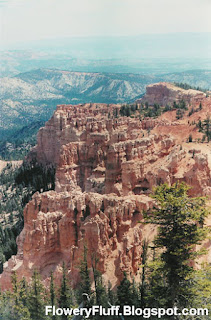
Back in May 2005 my dad, brother and I went around the western half of the country on a whirlwind driving trip. We visited Devils Tower and Badlands on the way to Mt. Rushmore, hit Chimney Rock, drove through Rocky Mtn National Park, then went through Black Canyon in Colorado, Arches, Canyonlands, Capitol Reef (quickly, at dusk), and Bryce Canyon NP's. We drove through Vegas, then up through Death Valley (we missed the record breaking wildflower blooms by a couple months), then up through Reno, and finally back up to Washington. Did I say that this was whirlwind?
We drove through the night to get to Devils Tower as the visitor center was opening,
saw Badlands midday,

and got to Rushmore almost as it was closing (but no busloads of people!).
We stayed in Chadron, Nebraska, that night and saw Chimney Rock in Nebraska before the visitor center opened the next morning.

Then we went on through the Rockies in northern Colorado, where I managed to misload my roll of film, so I have no pictures of the deer or caribou or whatever frolicking in the creek (no pictures at all, because I happened to not take any digitals then. Halfway out of the Rockies we ate at a fine mexican restaurant in Leadville (really pretty area). Then drove through Black Canyon of Gunnison NP. We stayed that night in Fruita, I think.

Next day was Arches NP first, where I got my film fixed. I was, and am, pissed about that. Now I take digital backups of most everything I take film pictures of.

Anyway, after Arches was Canyonlands NP,

and then through Capitol Reef. We didn't actually see the Reef, I don't think, but we saw some Indian drawings on the rocks. It was getting dark quickly, so taking pictures was not possible. We stayed within an hour or two of Bryce that night. Got the last room in the area, actually, because some guy didn't reserve his room with a credit card. So we got it because we were there and had a way to pay. So Bryce was awesome, of course. We stayed there quite a while (well, compared to our pace over that previous couple days). Then on our way to Vegas we didn't drive through Zion NP. I was upset about that. I don't know why we did that except we had a schedule to keep, I guess.


So then we drove through Vegas and through Death Valley to Badwater.
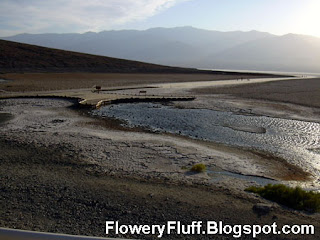
It was late in the day and time to start looking for a place to stay. The power was out in the valley, so the people who were staying there and at the big resort were displaced. This made lodging so late in the day hard, but we got a place out in Lone Pine, CA. That morning was nice, with a nice view of the other side of the Sierras, Mt. Whitney in particular.
And a bigger version of the picture at the bottom of the screen:

Then up to Reno to visit relatives and on through the night again back home. Whew! The whole trip wasn't more than 5 days.
Can you spot the film pictures vs. digital? It's pretty obvious sometimes. The two Aches pix are film, through the telephoto. And the first three Bryce pix are film, and for some reason have a black streak running down the middle of them (I sort of was able to Photoshop them out).
Here's a GoogleMaps map of the route (click for a readable version):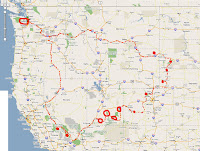 Click for full post and comments
We drove through the night to get to Devils Tower as the visitor center was opening,

saw Badlands midday,

and got to Rushmore almost as it was closing (but no busloads of people!).

We stayed in Chadron, Nebraska, that night and saw Chimney Rock in Nebraska before the visitor center opened the next morning.

Then we went on through the Rockies in northern Colorado, where I managed to misload my roll of film, so I have no pictures of the deer or caribou or whatever frolicking in the creek (no pictures at all, because I happened to not take any digitals then. Halfway out of the Rockies we ate at a fine mexican restaurant in Leadville (really pretty area). Then drove through Black Canyon of Gunnison NP. We stayed that night in Fruita, I think.

Next day was Arches NP first, where I got my film fixed. I was, and am, pissed about that. Now I take digital backups of most everything I take film pictures of.


Anyway, after Arches was Canyonlands NP,

and then through Capitol Reef. We didn't actually see the Reef, I don't think, but we saw some Indian drawings on the rocks. It was getting dark quickly, so taking pictures was not possible. We stayed within an hour or two of Bryce that night. Got the last room in the area, actually, because some guy didn't reserve his room with a credit card. So we got it because we were there and had a way to pay. So Bryce was awesome, of course. We stayed there quite a while (well, compared to our pace over that previous couple days). Then on our way to Vegas we didn't drive through Zion NP. I was upset about that. I don't know why we did that except we had a schedule to keep, I guess.


So then we drove through Vegas and through Death Valley to Badwater.

It was late in the day and time to start looking for a place to stay. The power was out in the valley, so the people who were staying there and at the big resort were displaced. This made lodging so late in the day hard, but we got a place out in Lone Pine, CA. That morning was nice, with a nice view of the other side of the Sierras, Mt. Whitney in particular.

And a bigger version of the picture at the bottom of the screen:

Then up to Reno to visit relatives and on through the night again back home. Whew! The whole trip wasn't more than 5 days.
Can you spot the film pictures vs. digital? It's pretty obvious sometimes. The two Aches pix are film, through the telephoto. And the first three Bryce pix are film, and for some reason have a black streak running down the middle of them (I sort of was able to Photoshop them out).
Here's a GoogleMaps map of the route (click for a readable version):
 Click for full post and comments
Subscribe to:
Posts (Atom)